原创发表于 DavidZ Blog,遵循 CC 4.0 BY-NC-SA 版权协议,转载请附上原文出处链接及本声明。
¶前言
计算机这个专业,有很多报告要做。在山威的时候,报告格式没有什么限制 Word,PDF 都可以,那个时候我开始使用 Markdown 作为我的排版工具,因为实在是没有时间经历去研究 Word 的各种高级功能(主要是懒)。Markdown 十分简单,易学,在Github等计算机专业相关平台使用也非常广泛,还可以通过各种模板快速生成好看,美观,专业的文档。
后来到了澳国立,老师教授们开始极力鼓吹 Latex 和 PDF,基本上算是软性要求我们使用 Latex 编写,还规定了衬线字体,非衬线字体,字号,段落等等,图片还需要是 SVG 格式的矢量图片(最奇葩的是竟然一整节课只讲这个😂),最后生成 PDF 提交(据说这样分数高一些)。所以我开始了漫漫 Latex 学习之路。然而整个过程十分痛苦,装个 TeX Live 跑了好几个小时,换个字体换的我一脸懵逼,预览竟然都不是实时的!!!我甚至觉得还不如 Word 好用,又开始找那些 Latex 编辑器(同学的 MacOS 上有很不错的,然而我是 Windows),之后是在线编辑器Overleaf,体验还行,但是一边学习 Latex 一边做实验写报告的体验实在是太差劲了,人都要有丝分裂了。我就先用 Markdown 记录下来,想着之后再改成 Latex 吧。然后,我用了 2 天左右的时间,找到了 Markdown 直接转报告的方法,就没再碰 Latex(还是懒)。
¶样例
你也可以从这里看一下我的成果作为参考,我觉得完全符合我的要求。
¶思路
其实思路很简单,一切的一切都是因为Pandoc这个文档转换软件软件(类似于影音界的格式工厂?)的存在。它官网有一张巨型图片描述了它可以从那些格式转换成那些格式,基本上可以说覆盖了常见的所有文档格式。所以我们就可以用它把 Markown 语言写的文档转换成 PDF 格式的报告,过程中再用一套模板修饰一下就好啦。
注意
Pandoc 通过 Markdown -> Latex -> PDF 的方式得到 PDF,中间文件是 Latex
¶准备
¶Markdown 语法
注意
Markdown 实际上和 HTML 是“近亲”,你甚至可以直接使用 HTML 标签。
这个百度或者谷歌一下,很容易找到教程,学起来也很简单,10 分钟上手,1 天熟练。
¶Markdown 编辑器
下面这俩我都有,看心情切换😄。
¶选项 1: VSCode
微软出品,宇宙最强 IDE Visual Studio 的“弟弟”,宇宙最强编辑器。
虽然 VSCode 原生支持 Markdown,但是下面这几个属于增强型插件:
Markdown Preview Enhanced,增强 Markdown 的预览效果,比如支持公式,清单之类的。Code Spell Checker,检查你报告里的拼写错误(不过好像只支持英文)。Markdownlint,检查 Markdown 的语法规范(强迫症专属)。Prettier,格式化 Markdown 代码(强迫症专属)。
¶选项 2: Typora
写作体验一级棒👍。
官网下载安装包,双击安装即可。
¶Latex Engine
注意
Latex 是个语言规范,Latex Engine 是它的实现,下面这俩都是 Latex Engine 的集合
因为 Scoop 里面只有 MiKTeX,所以我选择 MiKTeX。反正我只是写个报告,选哪个应该都无所谓吧。
¶选项 1: MiKTeX
通过 Scoop 安装:
scoop install latex
或者官网下载安装。
¶选项 2: TeX Live
官网下载安装。
¶Pandoc
¶Pandoc 主程序
这个就是前文所说的万能文档格式转换器软件了。
通过 Scoop 安装:
scoop install pandoc
或者官网下载安装。
¶Pandoc Filter
Pandoc 支持自定义过滤器,类似于插件,支持 Lua, Haskell, Python(对于想要自己尝试开发的同学,强烈推荐Panflute,比官方的pandocfilters更人性化一些)。
¶原理
INPUT --> reader --> AST --> filter --> AST --> writer --> OUTPUT
- INPUT: Pandoc 的输入。
- reader: 把输入解析成 AST。
- AST(Abstract Syntax Tree): 抽象语法树,这个是 Pandoc 的核心组件,是对所有支持的文件类型的抽象。
- filter: 这里就是我们的过滤器了,注意他的输入和输出都是 AST。
- writer: 把 AST 解析成输出。
- OUTPUT: Pandoc 的输出。
¶例子
上调所有小于 6 的标题的级别,如果大于 6,则删除标题(把标题变成段落)。
from panflute import *

def increase_header_level(elem, doc):
    if type(elem) == Header:
        if elem.level < 6:
            elem.level += 1
        else:
            return [] #  Delete headers already in level 6

def main(doc=None):
    return run_filter(increase_header_level, doc=doc)

if __name__ == "__main__":
    main()
然后在 Pandoc 的命令中用--filter指定这个 Python 文件即可。
¶推荐
用于 Pandoc 中的交叉引用,图片,公式,章节等,这个我也是用 Scoop 安装的,没有 Scoop 的话看看安装教程吧。
| 类型 | 标识 | 引用 |
|---|---|---|
| 图片 | {#fig:label} |
@fig:label |
| 公式 | $$ math $$ {#eq:label} |
@eq:label |
| 表格 | : Caption {#tbl:label} |
@tbl:label |
| 段落 | # Section {#sec:label} |
@sec:label |
| 代码块 | : Listing caption {#lst:label} |
@lst:label |
用于 Pandoc 中的文献引用,这个是自带的,无需安装。
需要指定 BibTeX(.bib) 文件来指定你的参考源,长这个样子,
@article{vinyals_show_2015,
title = {Show and Tell: A Neural Image Caption Generator},
url = {http://arxiv.org/abs/1411.4555},
shorttitle = {Show and Tell},
abstract = {Automatically describing the content of an image is a fundamental problem in artiďŹcial intelligence that connects computer vision and natural language processing. In this paper, we present a generative model based on a deep recurrent architecture that combines recent advances in computer vision and machine translation and that can be used to generate natural sentences describing an image. The model is trained to maximize the likelihood of the target description sentence given the training image. Experiments on several datasets show the accuracy of the model and the ďŹuency of the language it learns solely from image descriptions. Our model is often quite accurate, which we verify both qualitatively and quantitatively. For instance, while the current state-of-the-art {BLEU}-1 score (the higher the better) on the Pascal dataset is 25, our approach yields 59, to be compared to human performance around 69. We also show {BLEU}-1 score improvements on Flickr30k, from 56 to 66, and on {SBU}, from 19 to 28. Lastly, on the newly released {COCO} dataset, we achieve a {BLEU}-4 of 27.7, which is the current state-of-the-art.},
journaltitle = {{arXiv}:1411.4555 [cs]},
author = {Vinyals, Oriol and Toshev, Alexander and Bengio, Samy and Erhan, Dumitru},
urldate = {2020-06-01},
date = {2015-04-20},
langid = {english},
eprinttype = {arxiv},
eprint = {1411.4555},
keywords = {Computer Science - Computer Vision and Pattern Recognition}
}
以及 Citation Style Language(.csl)文件来指定你想要的引用格式,比如 APA,MLA,Chicago,Harvard 或者国内常用的 GB7714-2005,可以从citation-style-language/styles下载。
在文中用[@vinyals_show_2015]对应引用源即可实现引用自动生成,十分方便。
¶Pandoc Theme: Eisvogel 主题
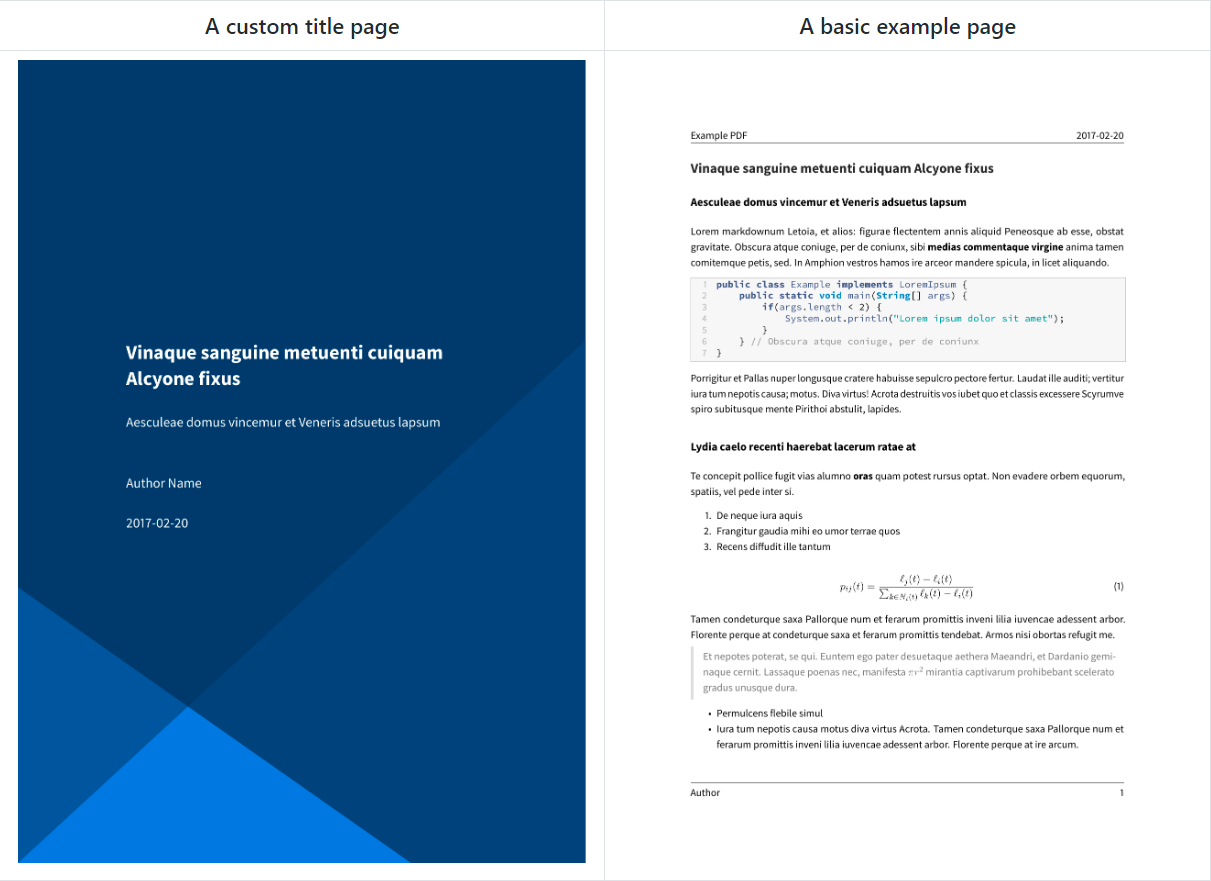
这个是我找到的计算机专业风格的论文/报告/书籍/幻灯片的开源模板,对于我来说是真的很合适了,美观,简约又专业。
Github Release下载,放到指定路径,就完了,很简单。
¶配置
---
# Pandoc
title: Title of the Report
author: Jiahao Zhang
date: Jul. 3, 1998
block-headings: true
documentclass: article
papersize: a4
geometry: margin=2.5cm
mainfont: Calibri
sansfont: Calibri
monofont: JetBrains Mono
CJKmainfont: Microsoft YaHei
fontsize: 10pt
listings: true
toc: true
toc-depth: 2
secnumdepth: 4
bibliography: [resources.bib]
csl: ieee.csl
# Eisvogel
titlepage: true
header-right: Report
footer-left: Australian National University
toc-own-page: true
table-use-row-colors: false
listings-no-page-break: false
code-block-font-size: \normalsize
# Crossref
subfigGrid: true
autoSectionLabels: true
# Citeproc
link-citations: true
reference-section-title: References
---
在每个 Markdown 文件最上面形如上面 YAML 代码的叫做YAML Front Matter,可以理解为对全文的配置。这里主要是一些对Pandoc,Eisvogel, Crossref 和 Citeproc的配置。
¶生成
运行下面的命令就可以生成 PDF 啦😄。
pandoc Report.md `
-o Report.pdf `
--standalone `
--listings `
--number-sections `
--filter pandoc-crossref `
--filter=pandoc-citeproc `
--pdf-engine=xelatex `
--template eisvogel
简单解释一下,
-o指定输出文件--standalone独立完整文件--listings使用listings高亮代码--number-sections启用段落编号--filter pandoc-crossref使用过滤器pandoc-crossref--filter pandoc-citeproc使用过滤器pandoc-citeproc--pdf-engine=xelatex指定 PDF 的 engine 为xelatex--template eisvogel指定模板为eisvogel
¶想法
完整的捣鼓下来其实也和学习 Latex 难度差不多了,但是配置完了这一套,只要要求不变,我再写报告的速度会加快很多很多,因为我只需要专注的写 Markdown 就好了😄。
PS: 这个博客所有的文章就是使用 Markdown 编写的。